Medium Baby Dolls 14 to 16 Inches like
Bitty Baby, Maxi Muffin, Baby Born
And AG and Gotz 18 Inch
Dolls
Long
Dress or Nightgown Pattern
and Sewing Instructions
Pinafore
or Apron Pattern and Sewing Instructions
|
Bitty Baby in long dress |
New Born Baby in long dress
and pinafore - apron |
|
Maxi Muffin in long dress |

Clothes Patterns
for 18 Inch Dolls and Bitty Baby
Dolls & Costumes Website
Susan Kramer
susan@susankramer.com
Contents
Long Dress or Nightgown Pattern
Apron or Pinafore Pattern
|
Long
Dress or Nightgown Pattern and Sewing
Directions |
Here are pattern pieces for making
dresses to fit 14-inch to 16-inch Bitty Baby in the American Girl Dolls series,
Baby Born or similar baby dolls. It also fits 18-inch full body dolls like AG
and Gotz.
This pattern is my original design and may not be used commercially.
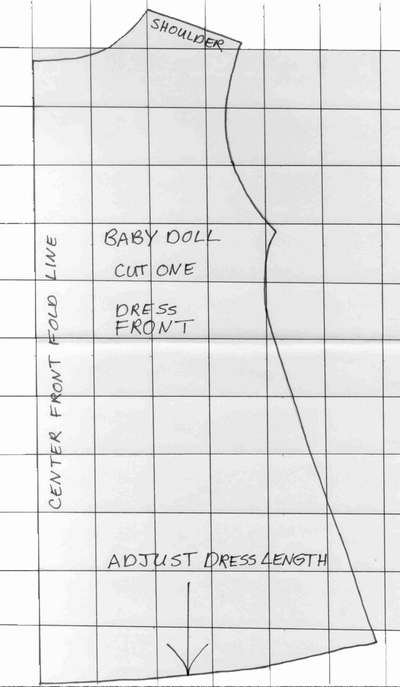
Pattern pieces - quarter inch seam allowance included
Dress front
Cut one on front fold.
Dress back
Cut two pieces.

Sleeves
Cut two with sleeve top on fold.

To make your 1-inch square (2.5cm) grid graph paper
First, take an 8.5x11 inch piece of plain paper and draw 1 inch squares - I do
this by drawing horizontal lines 1 inch apart down the page, and then vertical
lines 1 inch apart across the page.
Next, looking at the .jpg image you want to enlarge, copy what is in each of my
squares into your larger squares.
Seam allowances of 1/4 inch are included.
Sewing Instructions

You’ll need one half yard (one half meter) of material
for the dress.
To finish the neckline, you'll need 10 inches (25cm) of half inch (1.25cm)
gathered lace, and the same amount of a bias strip for finishing neck edge as
in photo. You'll also need 1 yard of one-fourth inch (6mm) satin or cross-grain
ribbon for the dress front trim.
Dress
With right sides of back and front dress facing, sew together at shoulders.
Press seam open.
Baste right side of lace to right side of neck opening, with top of lace
pointing down as in photo detail.

Using the bias strip sew one long edge over the sewing line of lace, turn to
inside of dress leaving one fourth inch of bias strip showing as in photo
detail. On inside turn in bias strip and sew to dress.
To finish back seam of dress, sew together along seam line of center back
leaving about 4 inches open at top as marked on pattern piece. For these two
open edges turn in one fourth inch twice and blind stitch seam. Overlap edges
and sew on a velcro dot for
closure. I do not use button closures on doll clothes that are used by
children, to avoid swallowing and choking.
Sleeves
Roll in lower edge and hem by hand or machine. (I sew sleeve and skirt hems by
hand.)
To make ruffle near lower edge of sleeve, gather with a strong thread, (I use
quilting thread for strength), just loose enough to slide over doll’s hand and
lower arm; about 5 inches (12.5cm).
Along armpit edge gather sleeve with basting stitch just inside the one-quarter
inch line to fit armhole and with right side of sleeve facing right side of
front and back dress (which are just joined at shoulders and now lay out flat)
stitch together with one fourth inch seam. Clip curve. Repeat for other sleeve.
With right sides of sleeves and dress facing, sew together sides of dress and
underside of sleeves at the same time. Repeat on other side.
Hem at lower edge of dress
When cutting out your material add or subtract hem
length according to length of your doll. For the dress in this photo which
fits Bitty Baby, I added 2 inches to the pattern length.
Turn in lower edge one fourth inch twice and blind stitch.
Now decorate the dress as you wish
Top stitch cross grain or satin ribbon in pattern as in photos or anyway you
wish. (A hint to sew ribbon in a straight line is to iron a crease in the dress
material to act as a guideline!)
|
Pinafore or Apron Pattern and Sewing
Directions |

This pattern is for pinafores to fit
14 inch to 16 inch Bitty Baby in the American Girl Dolls series, Baby Born, Gotz Maxi Muffin, and similar baby dolls.
This pattern is my original design and may not be used commercially.

Sewing Instructions
Here are sewing instructions for making pinafores to fit 14-inch to 16-inch
Bitty Baby in the American Girl Dolls series, Baby Born and similar baby dolls.

Bodice
Cut two pieces for bodice and place right sides
together. Beginning at lower front edge of bodice front sew
up the long side, and follow around all edges until you reach the other lower
front bodice edge at waistline. Leave seam across waistline open to turn bodice
right side out. Turn in lower edge one fourth inch and blind stitch closed. Press. See photo below:
Skirt
Turn up material for hem one quarter inch twice on sides and lower edge and
blind stitch.
Gather top edge of skirt to doll's waist measurement. I made this apron 14
inches (35cm) around the waist.
Center the gathered edge of skirt along the center of 1 yard of 1-inch satin or
cross grain ribbon, or ribbon you make from skirt fabric. Enclose the gathered
edge in the ribbon and sew in place.
Tie the skirt with a bow or in a square knot.
How to attach bodice to skirt
Center and sew in place the lower edge of bodice front one-half inch below
underside of top of waistband. Adjust placement to match the waistline of the
doll dress apron will go over.
To attach strap at back waist, fold straps up and back and sew to waistband one
half inch from center bow.
Have fun making baby doll clothes!
Article and photo credits Susan Kramer
|
Email:
susan@susankramer.com |
|
|
How to Sew Cloth Dolls and Costumes plus Traceable
Patterns |
Medium Doll Clothes |


Baby Christening Gown
E-pattern by Susan Kramer

Royal
Smocked Dress Pattern for 18 Inch Dolls
18 page Ebook of full size pattern pieces and
instructions
inspired by dresses of Princess Charlotte of the UK

~ please
visit again soon! ~
Dolls sitemap with many
patterns
page created August 12, 2009; updated January 11, 2013; April 12, 2021